Jewel360 now offers Stone Management, a game-changer for jewelry retailers. Stone Management streamlines the inventory control of stones and jewelry pieces, providing tailored product pages for various inventory types, from loose stones and serialized fine jewelry to non-serialized general products.
Key Features and Benefits:
- Tailored Product Pages: Stone Management has three distinct product page styles to cater to different types of jewelry inventory, enhancing your user experience and operational efficiency.
- Integration with GIA®: Automatically populates stone details from the Gemological Institution of America® certification numbers, saving time and reducing manual entry errors.
- Comprehensive Stone Management: Dedicated page for managing stones, allowing quick edits and adjustments, thus improving inventory accuracy and control.
- Enhanced Inventory Tracking: Supports serialized inventory management, crucial for products like rings and watches, ensuring precise tracking and reporting.
Using Stone Management in the Product Page
Create a New Product
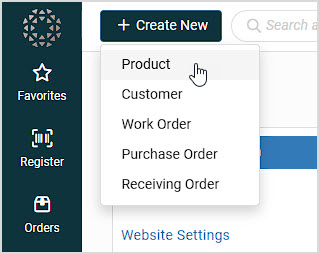
- Click the +Create New button at the top of the system and click Product from the list.
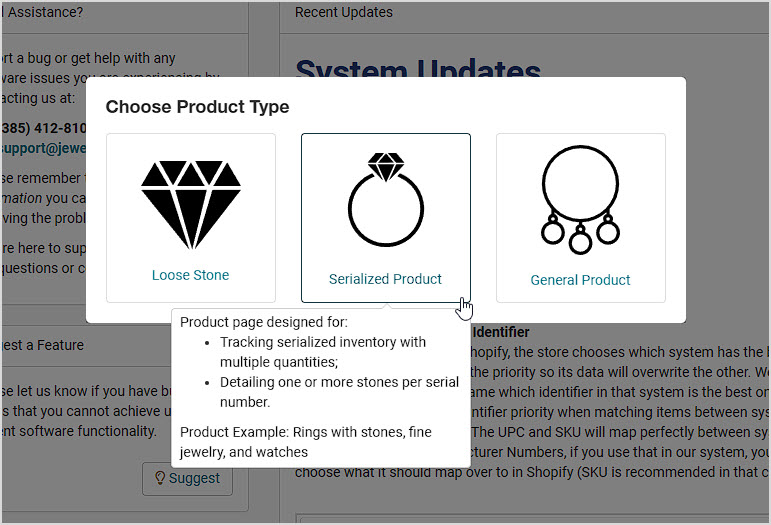
- A window will open offering three options for the type of product you will create: Loose Stone, Serialized Product, and General Product, as pictured below.
- You can hover over each option to see more details of how you can use each product type.
- Click the one you want to begin creating the product.
Creating a Loose Stone Product

Create your new Stone product using the steps above and click Loose Stone for the type of product. For full details on how to enter all parts of the product data, click the link below. This article will focus on the unique Stone Management features in this process. Here is the article (this link will open in a new browser tab for you): Product Page 3.0: Part 1 - Overview
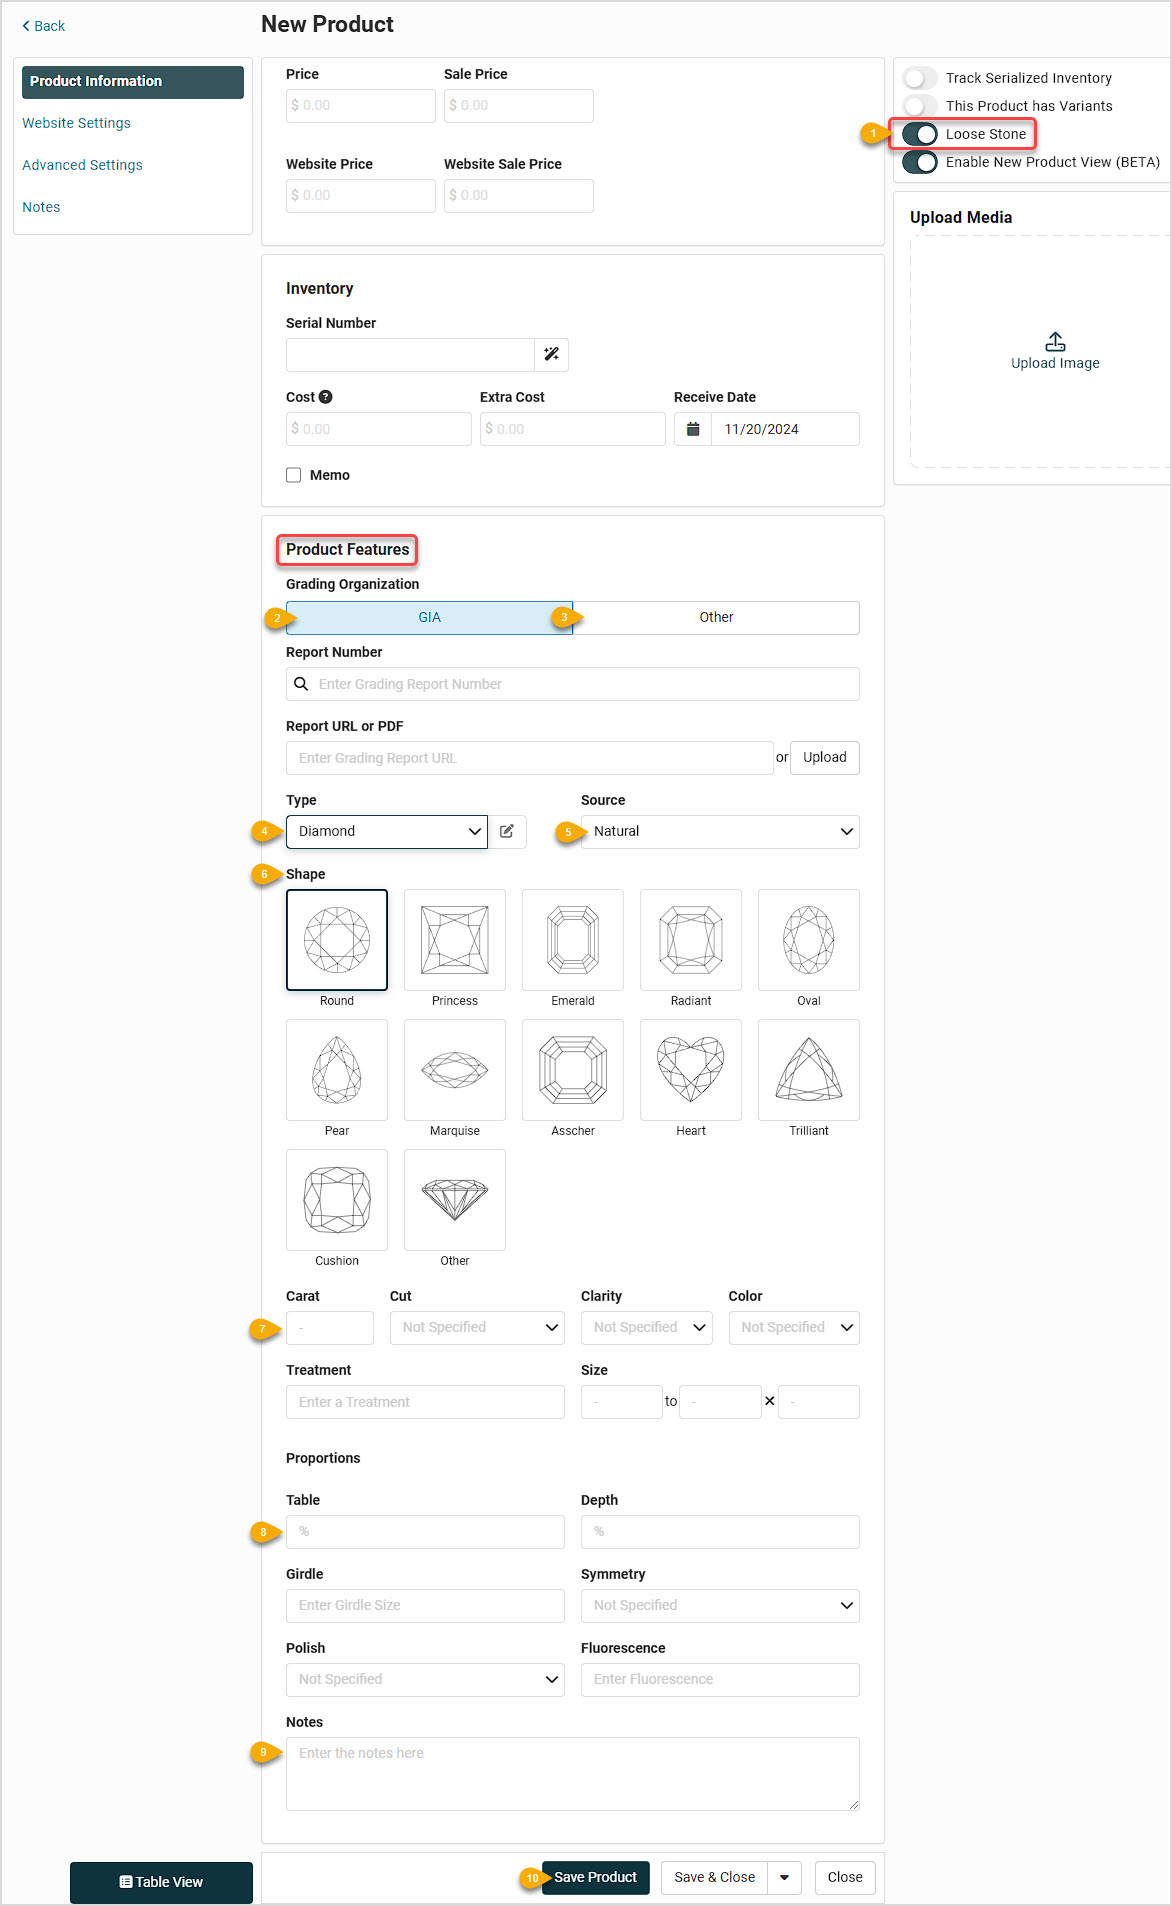
The Inventory tab is absent since loose stones are unique and don’t carry multiple inventory quantities.
Here are the key features of the Loose Stone functionality:
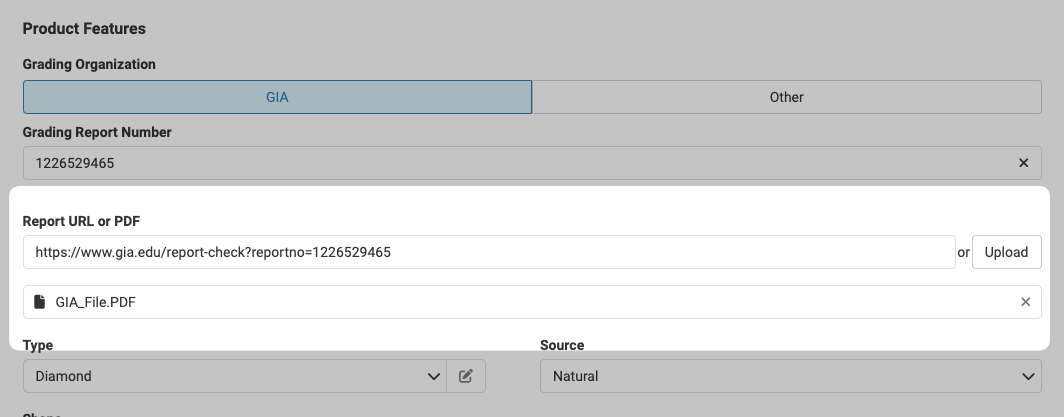
- Loose Stone - Please note the Loose Stone toggle in the upper right, which should be on by default. Scroll down the page to the Product Features section.
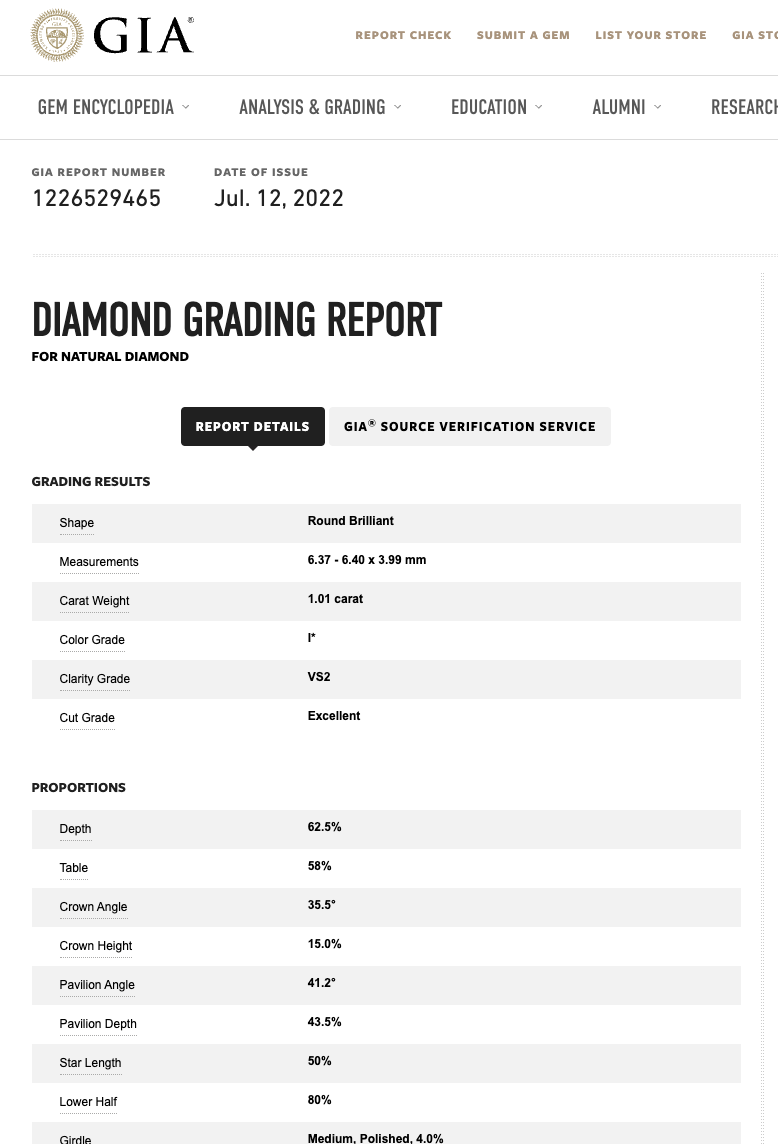
- Report Number - Enter the GIA® Report Number. When you enter the number, the integration with GIA® will auto-generate some or all of the stone detail information. You can view the stone's digital certificate or a PDF version.
- Other Grading Service - If using a different grading organization, there is an Other button where you can enter another organization name and report number. Since this method doesn't integrate with a grading service, the stone information will not auto populate. You will need to manually enter your stone information.
- Stone Type - The Product Features area allows you to choose the stone Type from a list of the most common. You can also click the Edit button to add any you need that aren't already in the list.
- Source - You can set the Source for the stone, by default it will be Natural but you can set it to Lab Grown for stones made that way.
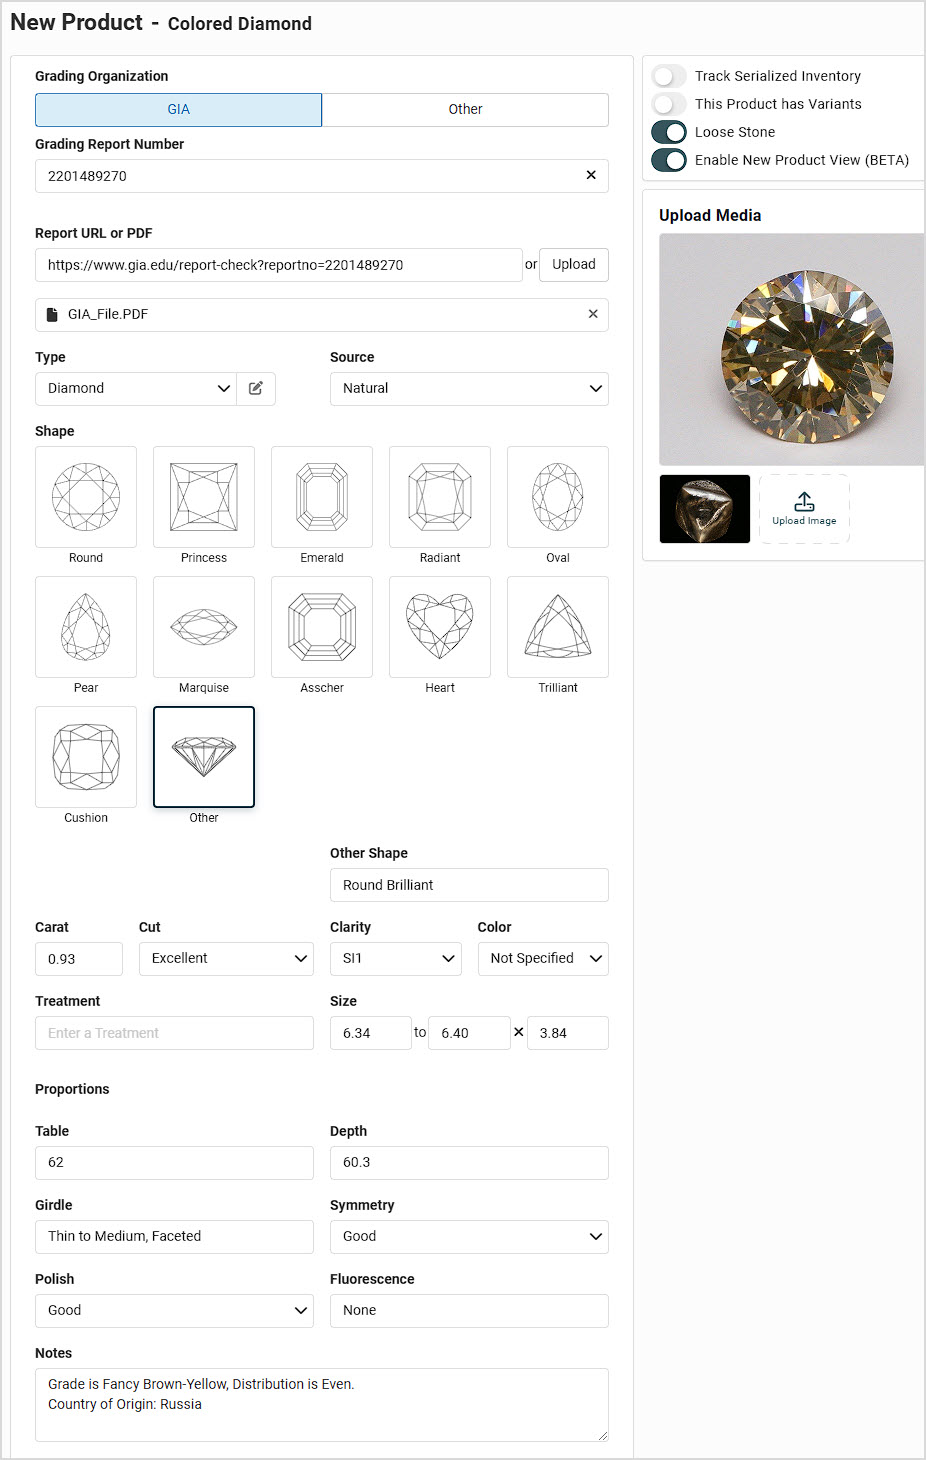
- Shape - You can choose the Shape of the stone from the common ones listed in this area, or choose Other if it's not available. When you choose the Other option, you are able to enter the name of the Other Shape, as pictured in the section below with the GIA Report Example stone.
- Stone Details - You can enter key details about the stone, such as the Carat weight, Cut, Clarity, Color, Treatment, and Size details in this area.
- Proportions - This area allows you to enter details on the stone's proportions, including the Table, Depth, Girdle, Symmetry, Polish, and Fluorescence.
- Notes - Use this area to enter any important details about the stone that were not covered above.
- Save Your Work - Once you've got everything entered, Save the stone information at the bottom.
Here is an example Loose Stone kindly provided by GIA to show you how the data in a report loads into this area:
Creating a Serialized Product
Create a new product using the steps above and choose Serialized Product for the kind of product you'll be making.
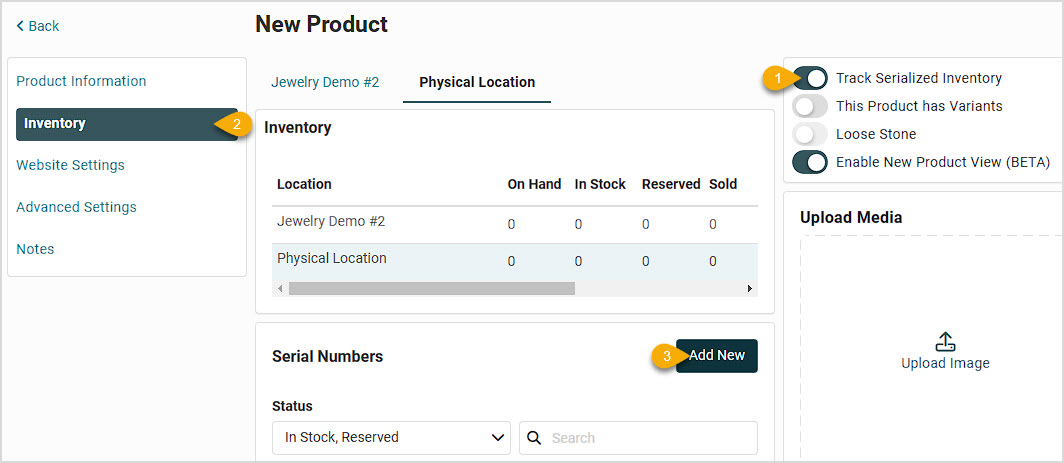
- Serialized Inventory - The Track Serialized Inventory toggle in the upper right will default to on.
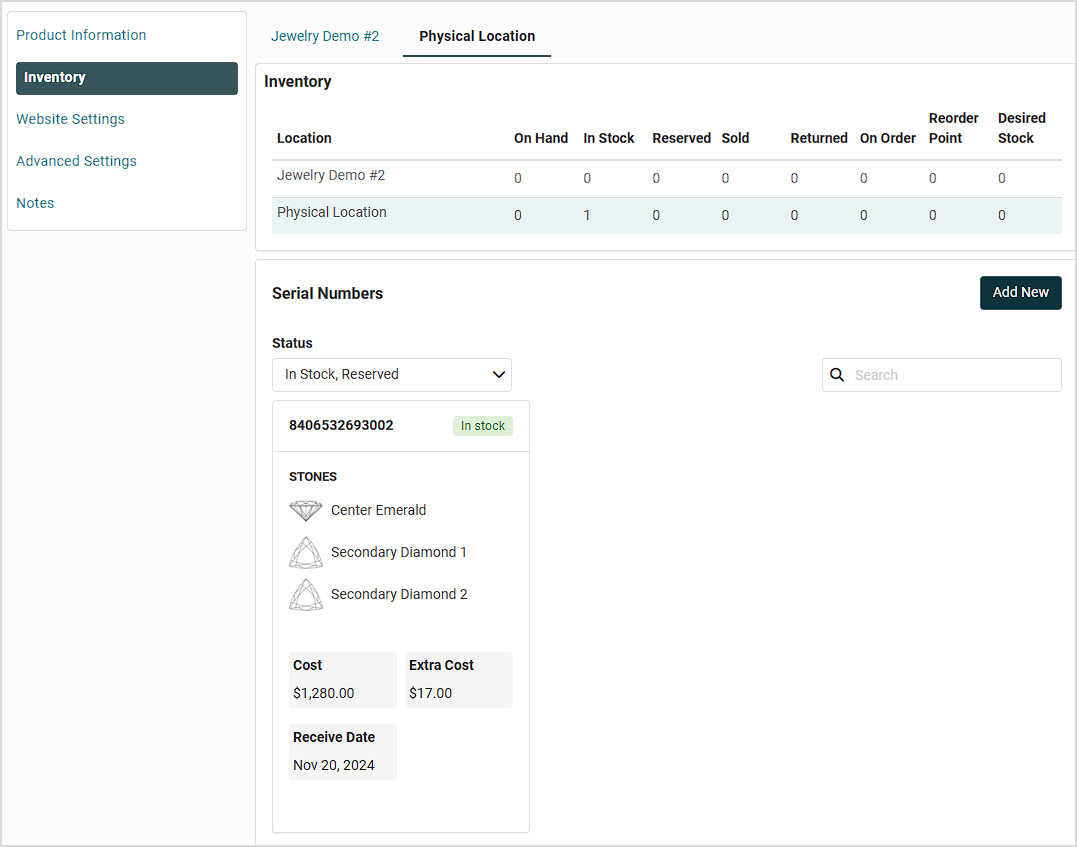
- Inventory Tab - Click the Inventory tab.
- Click the Add New button to add a serial number, the New Inventory window will open.

- Serial Number - Enter the Serial Number.
- Cost - Add Cost and Extra Cost(e.g. freight, shipping insurance, etc.).
- Receive Date - Enter the Receive Date.
- Memo - If the item is Memo inventory, check the box so the system will track the consignment.
- Stone Search - If the serialized item has one or more stones, you can use the Search to find a saved stone.
- Add a New Stone - Click the New Stone button to add a new stone for the serialized item.
- Stone Name - Give the stone a unique name if desired.
- GIA Graded Stones - Just as with Loose Stones above you can enter a GIA Grading Report Number. Once you have entered the report number, some or all the stone detail information will auto populate for you, and you can view the digital certificate or a pdf version.
- Other Grading Authority - If not using GIA, you can use the Other button to enter another organization name and report number. In this case the stone information will not auto populate and you will need to manually enter stone information.
- Stone Details - You can enter the Type, Source, and Shape for the stone. For Type and Shape, you can enter your own items if the default ones don't cover what you need.
- Additional Stone Info - If needed, you can enter the Carat weight, Cut, Clarity, Color, Treatment, and Size details.
- Proportions - If needed, you can enter the proportions details for Table, Depth, Girdle, Symmetry, Polish, and Fluorescence.
- Notes - You can add any detail notes you might need regarding the stone.
- Update - When you are done entering the Stones and key details for the item, click Update to set the info for the item. Please note, you will still need to click Save for the product to finalize saving your stone details.
You can enter as many stones as you need for the item. After you've clicked to Update the item details, you'll notice the item appears in a new card view unique to the Stone Management interface.
Create a General Product
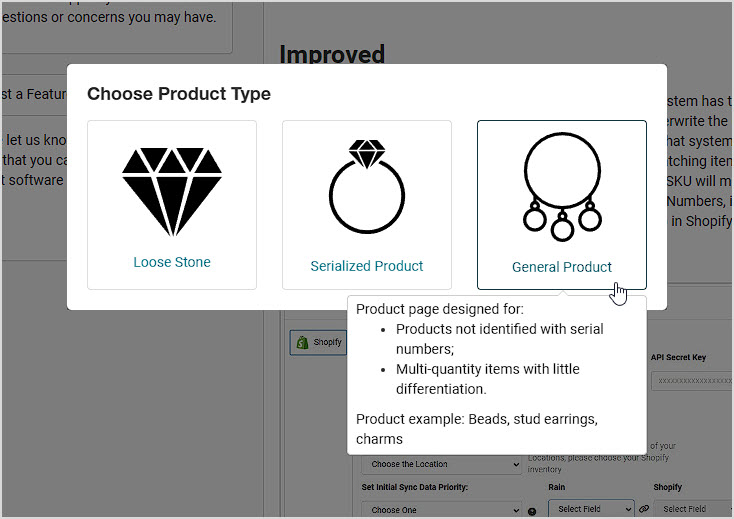
Create a new product and click General Product, as pictured above. This page is like existing product pages and doesn't include specific stone management features. You'll follow the same product creation steps you do for standard products, detailed here (this link will open in a new browser tab for you): Product Page 3.0: Part 1 - Overview
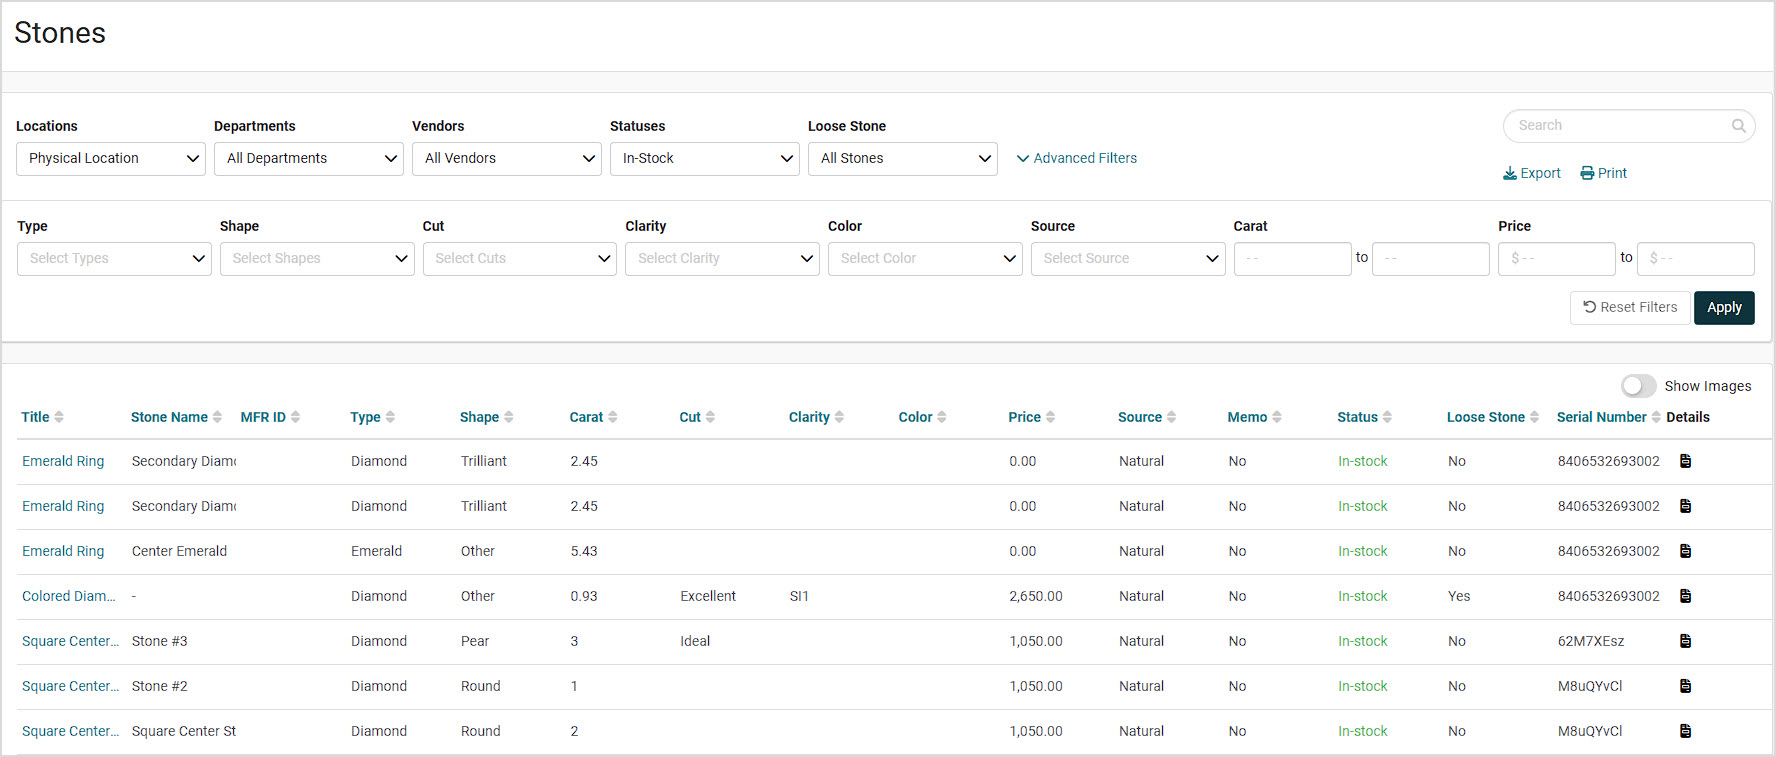
The Stones List Page
To view the full list of your Stones saved in the system, go to Inventory > Stones. Each stone is listed individually. If a serial number has multiple stones, they will be listed as separate line items and will be grouped by their serial number, with the Product Name being the same for all stones in the Title column. You can sort / reverse sort the page data by clicking any of the column headers, you also have the option to Show Images if that will help in your work with the stones.
Use Filters to sort by stone attributes. Loose Stones can be viewed separately by using the loose stone filter. In the Advanced Filters area you can filter by stone characteristics such as Type, Shape, Cut, Clarity, Color, Source, Carat weight range (you can enter two weights and the system will show all that fit within that range), and Price (you can also enter a range here). Click Apply to reload the page with your configured filters.
You can Export the page data to a CSV spreadsheet file, or Print it, if needed. Clicking the icons under the Details column will display the stone management window where you can view full details or make edits, if needed.
GIA® Integration
The new stone management pages include an integration with GIA. What this means is that when you enter a GIA report number, the system not only automatically pulls in and prefills the stone details, but also provides a pdf of the report and link to it as well. You can see these fields just below the report number.
Following the link will take you to the GIA website where you can see the official Grading Report which looks like this:
Clicking the pdf will provide the following view, which can be printed

Frequently Asked Questions
Q: Can I add multiple stones to a loose stone product page?
A: No, loose stone pages are designed for single, unique stones only.
Q: What happens if I don't have a certification report number?
A: You can manually enter stone details if a certification number is unavailable.
 October 01, 2024
Is this page helpful?
×Help us improve our articles